
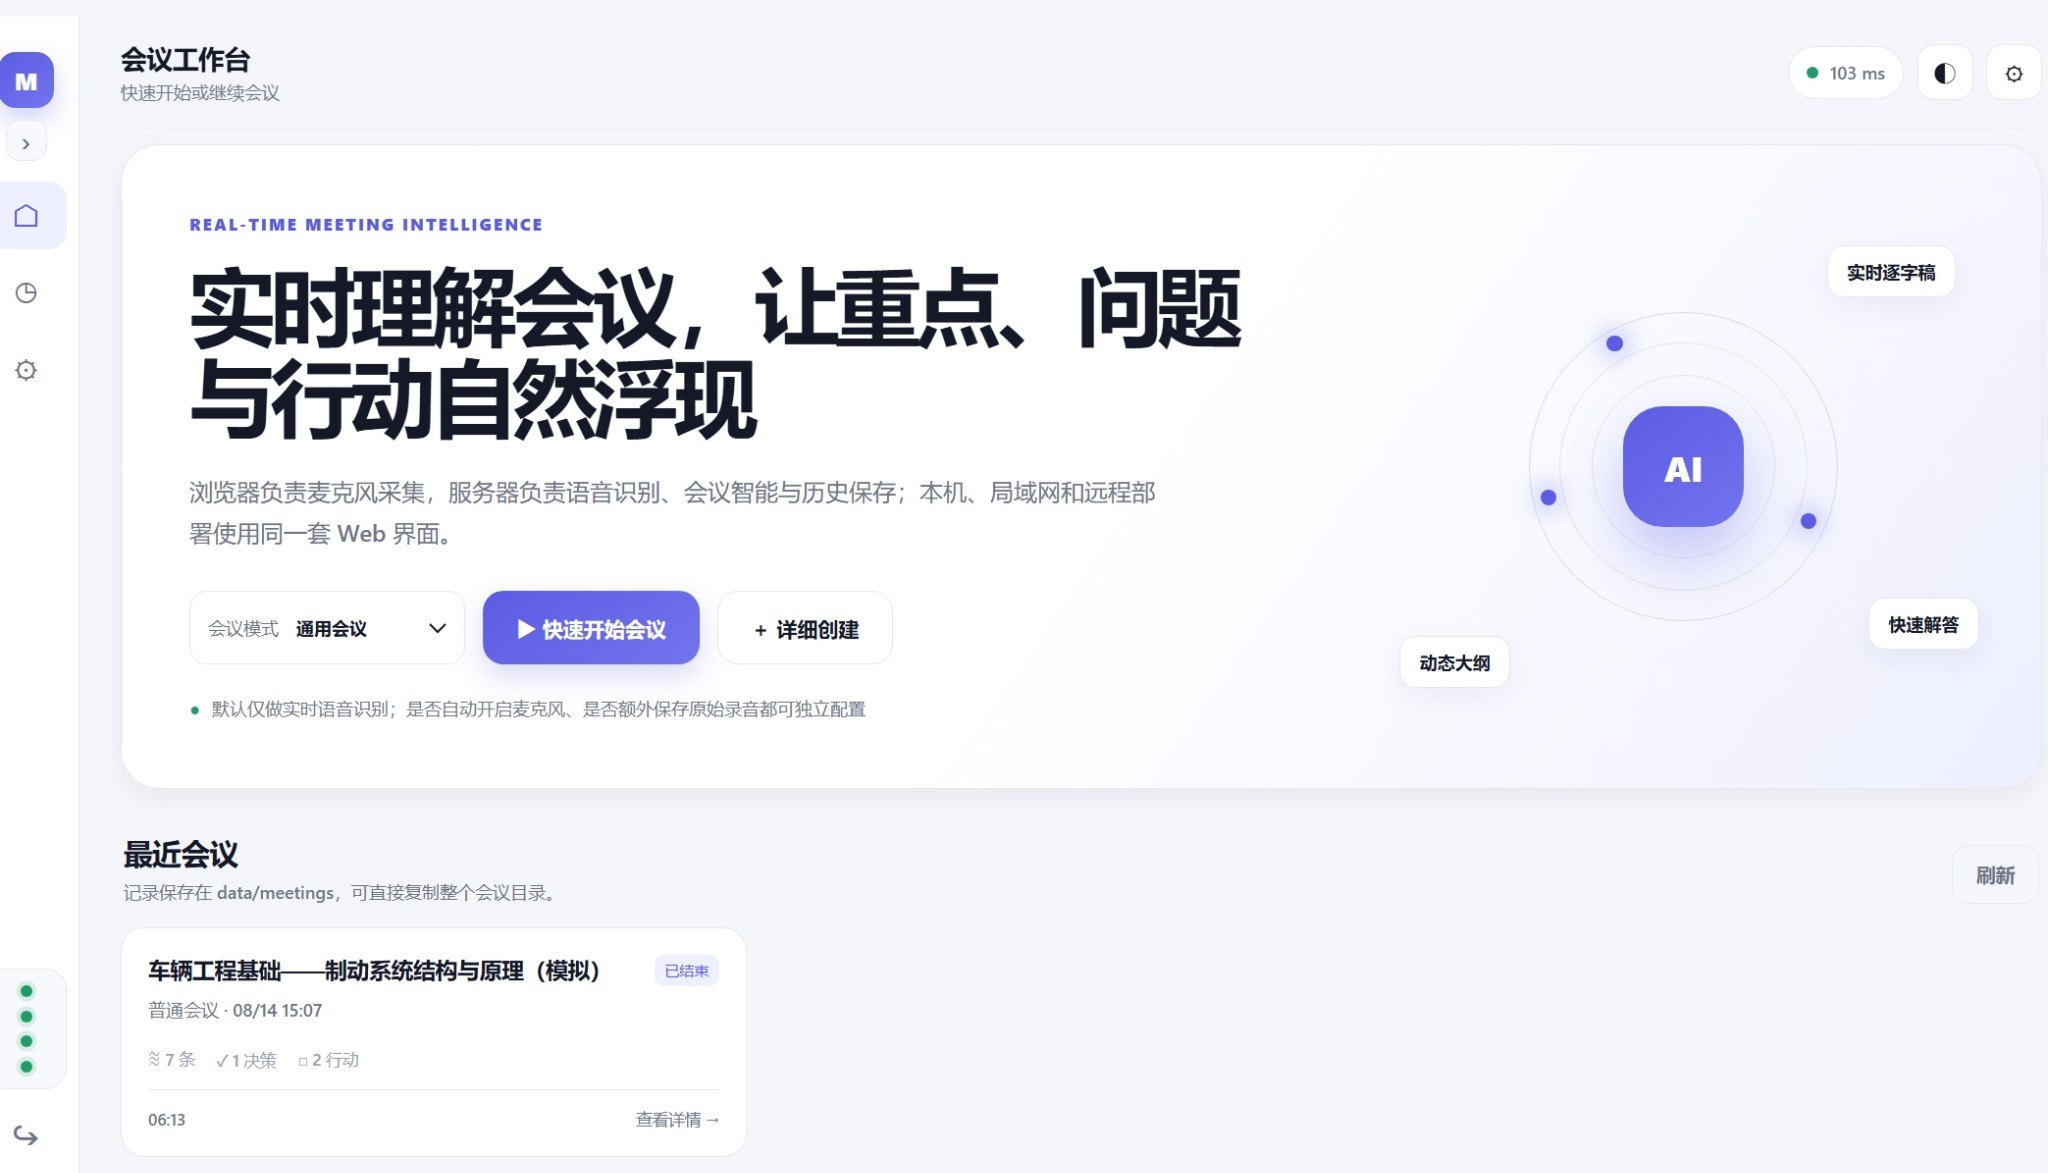
MeetingAI Local v2.1.1 It is a "local-first" set of intelligent tools for real-time meetings, designed for scenarios such as real-time meeting transcription, meeting analysis, AI-powered Q&A, long-form audio processing, and local knowledge management.
It is not merely a “voice-to-text” tool, but rather a meeting dashboard that runs in a browser: the browser handles microphone input, while the Python server handles ASR, meeting intelligence, AI scheduling, history storage, and the knowledge base. The system can be used in real time during meetings and also supports offline transcription and analysis of existing long recordings in formats such as MP3, WAV, and M4A after they are imported.
Windows Public Download:
Why We Created MeetingAI
MeetingAI is not designed merely to transcribe speech into long blocks of text, but rather to go a step further and enable participants in meetings toKey points, issues, actions, and risks naturally come to light.
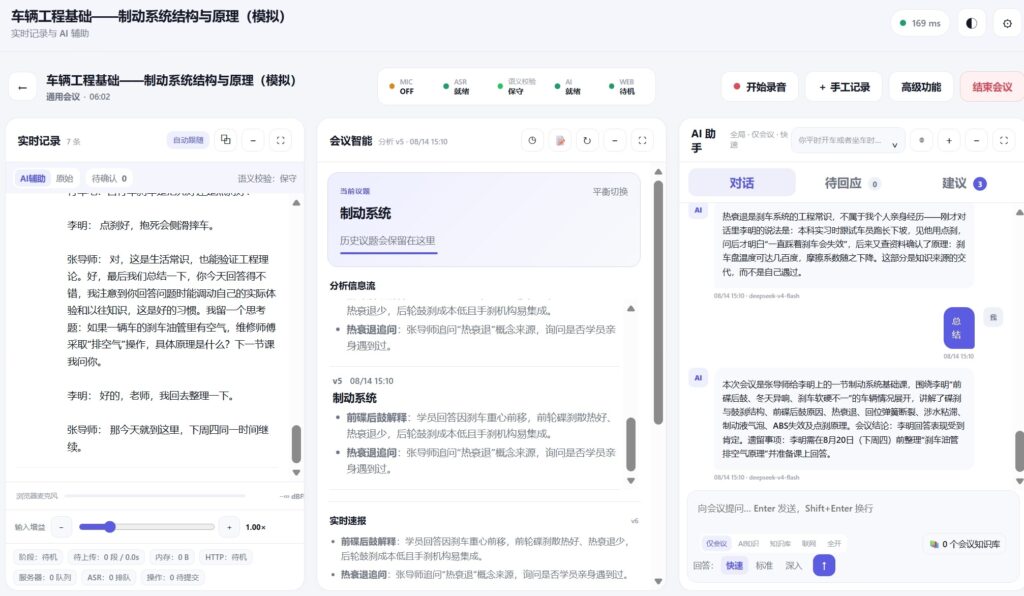
Currently, MeetingAI's main workspace consists of three columns:
- Left: Real-time recording;
- Center: Smart Conferencing;
- On the right: AI Assistant.
The original verbatim transcript is retained, while the AI continuously generates updates on the current topic, real-time briefings, key points, and stage summaries alongside it, and can directly answer questions about the meeting.
v2.1.1 Key Changes: AI Response Gateway
The focus of v2.1.1 is not on adding a new surface button, but rather on making adjustments to the AI infrastructure layer.
More and more models now support reasoning and thinking. A typical response might be:
reasoning:
Internal analysis process of the model

final:
The answer that should actually be shown to the user
If the system fails to distinguish between these two parts correctly, a very strange problem may occur:
Even though the model was clearly just making an internal determination that “there is no new information, so it should return an empty string,” the system displayed this internal reasoning directly as a real-time alert.
Therefore, MeetingAI has added a unified layer between the AI provider and the meeting service, AI Response Gateway::
AI Provider
 ↓
AI Response Gateway
 ├─ Isolation of reasoning/thinking
 ├─ Extraction of final answer
 ├─  tag cleanup
 ├─ Text/JSON output contract
 └─ "final-only" retry if necessary
 ↓
MeetingAI Business Layer
This means:The model is allowed to think, but its thought process will not automatically become part of the meeting content.
In v2.1.1, this Gateway also added background observability:
- Number of AI calls processed;
- How much reasoning has been isolated;
- Valid empty output;
- Automatic retry;
- Abnormal state;
- Recently called tasks, models, elapsed time, and the number of characters in the "final" and "reasoning" sections.
Also available protect / observe / bypass Three modes.
It is important to note that even if full Gateway protection is disabled and the system enters safe bypass mode, the system will not revert to the dangerous behavior of providing a "fallback answer with an empty reasoning and 'final' status."
The original verbatim transcript and the AI's interpretation are separate.
MeetingAI applies a similar approach to ASR processing.
Original:
transcript.jsonlAlways preserve the original ASR/human-verified evidence so that AI cannot secretly alter it.
AI's semantic verification of recognition results is handled separately:
transcript_semantics.jsonlIn the middle.
For example, ASR takes Ollama If a term is identified as a homophone, the AI can suggest a correction with high confidence in the “AI-Assisted” view; however, higher thresholds are applied to facts such as amounts, dates, personnel, responsible parties, contract terms, and key decisions. If the AI cannot confirm a term, it is marked as “Pending Confirmation” rather than making an unfounded assumption.
So the entire process is:
Audio
→ ASR
→ Raw Transcript
→ AI Semantic Annotation Sidecar
→ Meeting Intelligence / AI Assistant / AI Notes
If the AI makes an error or the provider is temporarily unavailable, the system will automatically fall back to the original transcript without interrupting the main flow of the meeting.
Supports importing very long audio files, such as MP3s
In addition to real-time microphones, MeetingAI also supports importing existing recordings.
Common supported formats include:
MP3 / WAV / M4A / AAC / FLAC / OGG / OPUS / WEBM
MP4 / MOV / MKV audio tracks
After importing, the entire several hours of audio won't be loaded into memory all at once; instead:
Save original file to disk
→ Decode with FFmpeg
→ Split into segments of fixed duration
→ ASR in the background
→ Write transcript back to the timeline
→ AI semantic verification
→ Intelligent meeting analysis
The current approach isFixed-Duration Segmentation, default 60 seconds; can be adjusted between 10 and 600 seconds; for a single import, you can also directly select 30, 60, 90, or 120 seconds, or a custom duration.
The current version does not yet include "Smart Mute Boundary Splitting"; instead, it prioritizes a fixed-duration splitting scheme that is more predictable, easier to recover from, and better suited for very long tasks.
On-Premises AI, Knowledge Base, and Scope of Answers
The AI assistant supports multi-turn conversations and distinguishes between "depth of response" and "scope of knowledge."
Depth of Answer:
Quick / Standard / In-DepthScope of the answer:
Meetings Only / AI Knowledge / Knowledge Base / Online / All OptionsFor example, you can choose from the following options as needed:
- Based solely on the responses given at this meeting;
- Use the AI's own knowledge to supplement the information;
- Use the specified local knowledge base;
- Online inquiry;
- Or turn them all on.
The knowledge base currently supports recursive scanning and incremental indexing of local TXT and Markdown documents, and does not require the deployment of a large vector database to get started.
Runtime Environment, GPUs, and the Domestic Network
MeetingAI does not handle the installation of Python itself, but the backend can detect whether:
- Python;
- CPU;
- Memory;
- NVIDIA GPU;
- Video memory;
- CUDA;
- PyTorch CUDA;
- FFmpeg;
- Core dependencies;
- ASR engines and models.
It supports commonly used Pip mirrors in mainland China, ModelScope and HuggingFace model sources, as well as HTTP(S) and SOCKS5 proxies.
Proxy scopes are separate; for example, you can configure the system so that only model downloads go through the proxy, while local Ollama requests bypass the proxy.
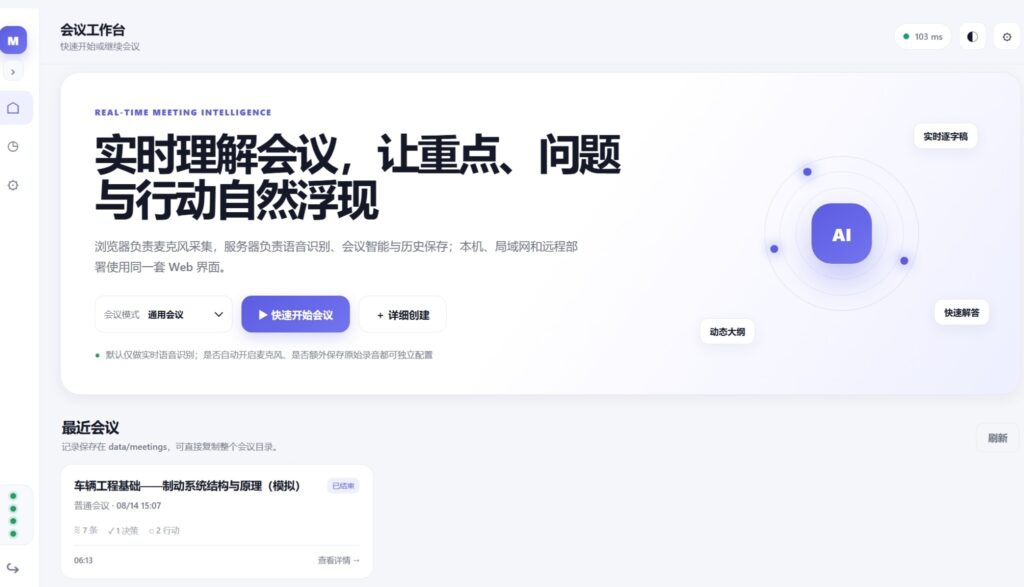
The left sidebar can now be collapsed
Version 2.1.1 also includes a simple but practical UI adjustment: the left-side navigation bar on the desktop version can now be collapsed.
When expanded, you can see:
MeetingAI
Meeting Intelligence

Home
Past Meetings
Backend Settings
When folded, only the icon and status light remain, freeing up more horizontal space for the three-column meeting workspace.
The sidebar state and the three-column collapse/expand feature within the meeting are two completely separate layout mechanisms; collapsing the left-side menu will not cause the three-column workspace to switch to a vertical layout.
Windows Installation Guide for Beginners
The following is written in a way that even someone new to Python can follow along.
Step 1: Install Python
MeetingAI Requirements:
Python 3.10 or laterPython 3.11 is recommended for 64-bit Windows environments.
When installing Python, be sure to check the following box:
Add python.exe to the PATHAfter installation is complete, open CMD:
python --versionIf you see:
Python 3.11.xThis is normal.
Step 2: Download and unzip MeetingAI
Unzip the WordPress download package into a simple directory, for example:
D:\MeetingAIDo not double-click the program directly inside the ZIP archive.
Step 3: Install Core Dependencies
Double-click directly:
install_core.batOr run the following in CMD:
cd /d D:\MeetingAI
python -m pip install -r requirements.txt
Step 4: Start
Double-click:
start.batOr:
python meetingai.pyThe first time you run it, it automatically generates runtime files such as the Web UI, Prompt, and Schema, as well as:
FIRST_RUN_PASSWORD.txtLog in using the password in this file.
The default local address is usually:
http://127.0.0.1:7777The address displayed when the terminal starts up shall prevail.
Step 5: Run the self-test once
python meetingai.py --self-testIf the self-check is successful, proceed to the backend to configure ASR and the AI provider.
Step 6: Configure ASR
Enter:
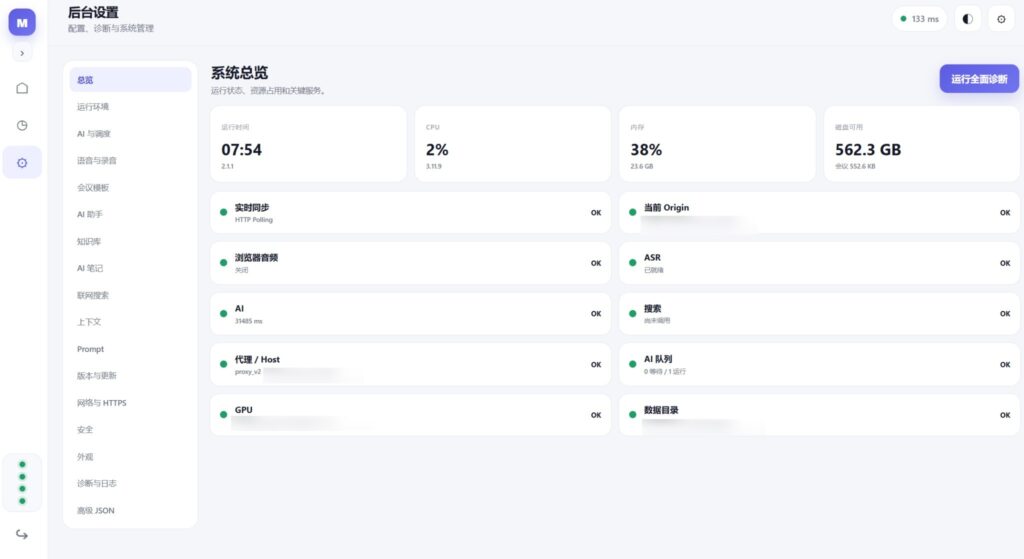
Backend Settings → Runtime EnvironmentFirst, let's look at the system diagnostic results.
Faster-Whisper
You can simply:
Double-click install_asr_whisper.batOr:
python -m pip install -r requirements-asr-whisper.txtFunASR / SenseVoice
FunASR users should first install PyTorch + torchaudio that are compatible with their computer's CPU/GPU, and then:
Double-click install_asr_funasr.batOr:
python -m pip install -U funasr modelscopeVerify the GPU:
python -c "import torch; print(torch.__version__, torch.cuda.is_available())"Step 7: Install FFmpeg
If you want to:
- Local ASR;
- Import MP3/M4A/MP4;
- Processing long recordings;
We recommend installing FFmpeg.
In CMD:
ffmpeg -versionIf the version is displayed, everything is working properly.
You can also enter it in the admin panel ffmpeg.exe The full path to .
Step 8: Configure the AI Provider
Enter:
Backend Settings → AI and SchedulingCan be connected to:
- Local Ollama;
- OpenAI-compatible Provider;
- Other compatible interfaces.
Once configuration is complete, you can use features such as Meeting Intelligence, AI Assistant, AI Notes, and ASR semantic verification.
